Draw a Box to Scale

Fourth dimension is precious and sometimes y'all demand a quick and like shooting fish in a barrel style to calibration upwards a drawing. This mail will guide you lot through 4 applied ways to overstate (or reduce) your paradigm.
These are the methods I apply, or have used, to scale a drawing:
- Grid your reference, overstate or decrease the ratio when drawing the grid on your paper,
- Measure two points with scale dividers, the contrary stop volition marking the same points on a unlike scale.
- Enlarge a photocopy to size, shade the reverse side, flip it over and trace the outline.
- Project the image onto a wall or canvas and trace the outline.
No fluff, let'southward spring right in.
(I get commissions for purchases fabricated through links in this post. However, I only promote products I like and recommend)
How to Scale Up Your Drawing Using a Filigree
The thought is very simple. You grid your reference, draw another grid on your drawing paper, and copy each box.
Accurateness is everything with this method. Your filigree must be spot on or things will go wrong. Cartoon an accurate grid is more difficult than information technology looks.
Brand a few photocopies of your reference photo. Now attempt to mensurate out the grid using a ruler. For argument's sake, let's say you are marking out a one-inch grid (25mm).
A pencil dot every inch, what could be more basic? Truthful, but it'south seldom accurate.
Well-nigh folks miss their mark and that has a knock-on issue.
You should use the width of the ruler to describe parallel lines along both edges. Information technology'southward more accurate than measuring each dot and drawing single lines. If the boxes are too large, draw diagonals within the boxes, it's quicker and more authentic than marking out the halfway bespeak betwixt two dots.

If you have a technical drawing board information technology will be easier to go things right. Use low-tack framers record to secure your paper. You don't want to tear the edges of your paper.
Apply the slider to place your horizontal lines and a CLEAN set-square to line upward the verticals.
What a PHAFF.
Try this instead, grid a digital file. Y'all'll need a photograph editor. If y'all know your fashion around uncomplicated photo-editing then download the grids below and layer them onto your paradigm.
If non, then apply a gratis tool called Pixlr.com (chapter)and follow these instructions.
The gratis online tools are great just you must put up with ads. The Premium version (chapter) has all the bells and whistles you could need and it's near $65 per yr at the time of writing. Its add together free and downloadable.

This is your landing page. at that place is no need to sign upward and login. Click the 'open paradigm' button.
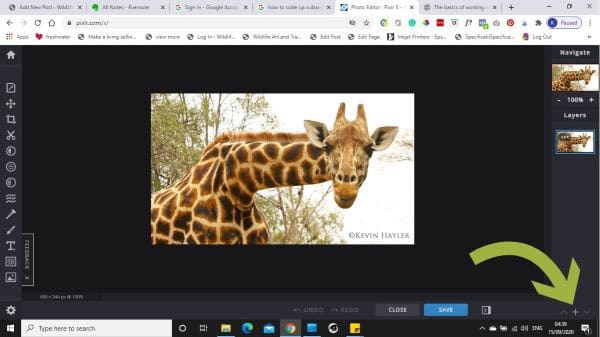
Your called file image volition announced in the photo editor. At present click the plus icon at the bottom right (+).
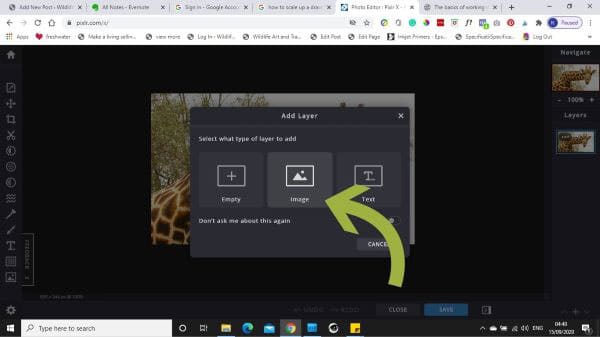
This dialog box volition pop upward. Click the prototype box. Find your grid file and open up it into the editor.

The filigree will be a new layer and announced on height of your original image. The arrows indicate to both layers in the sidebar. You tin conform the summit layer if you wish.
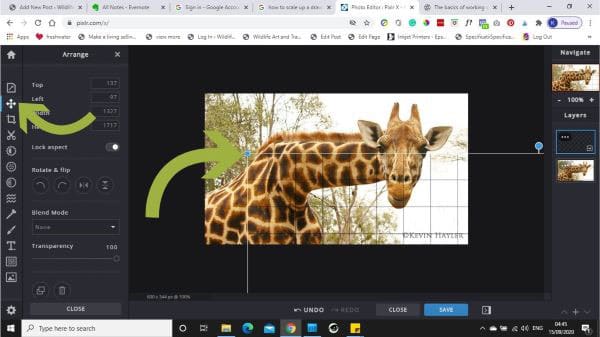
If you click the cross icon in the tiptop left corner you will be able to move the grid up and down. Motility the pointer over the grid and left-click the mouse (and hold it downwardly) to reposition the grid. You can enlarge or reduce the grid by dragging the blue corners diagonally.
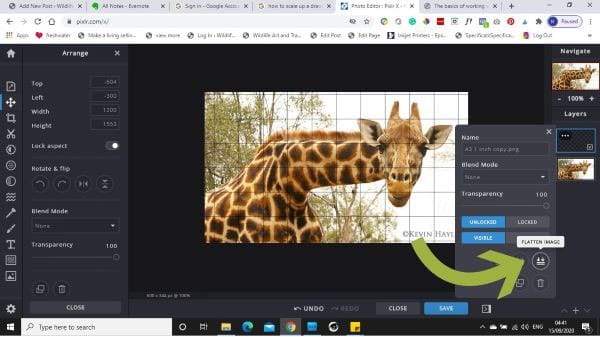
When yous are happy equally it is, flatten the paradigm. This locks the layers together into i image.

Download your file with a perfect grid. Yous will never draw a more accurate grid and information technology will only take you a few minutes.
You can draw a larger grid on your paper and work from the gridded file from your computer screen. I hate doing this.
If you take a printer, enlarge several copies to various sizes and print them off. Cull the copy size you lot'd be comfortable drawing and use that scale to draw it out, i:1. Far easier.
If you don't have a printer (and I don't) get an instant photograph printed and photocopy it, again in several sizes. I nip into my local library and do it there.
N.B. If you lot are going to print a photo brand sure y'all accept a large file so it doesn't pixelate.
If you lay your gridded photocopy onto your cartoon surface you can marking the lines accurately by using the copy equally your ruler.
Describe the grid very lightly over your cartoon paper. You want to avoid heavy lines that won't fully erase and you certainly exercise not desire to leave scorelines. Sounds obvious merely it's so easy to overlook.
I've fatigued whole backgrounds in a drawing just because I was as well heavy-handed and needed to disguise the grid lines I couldn't remove! Be warned.
Download Your Grids for Free. No Catch
How to Scale Up Your Drawing Using Dividers
If gridlines are not for you and you want to retain more of the sketchy fashion and feel, scale dividers will help.
Put only, dividers are two pointed bars joined together by a pivoted slider or peg holes. The artist measures two fixed points on their reference with i cease of the dividers and, using the other end, marks out the respective points on their paper. The new scale will be truthful and accurate with every subsequent measurement.
If you need some extra help read this: How to Plan and Compose Your Fine art: A Guide for Beginners
The cracking advantage of using proportional dividers (affiliate), in my stance, is how they permit you to retain the feel of freehand movement in your sketch. Using a grid is so precise information technology's easy to lose any sense of spontaneity.
Dividers permit you to pinpoint the central features of your subject area, such equally the distances between the optics, tip of the nose, and lips, etc, and mark them downwardly with certainty.
And so how do you fix the correct scale? It'due south unproblematic really. With a very light bear on, you sketch out the basic shape you desire the cartoon to be. For case, if you are drawing a portrait, depict an oval that feels comfortable for you. That's the calibration we are going to apply.
Now measure the dimensions of the head on your reference with your dividers. Place the other stop over your sketched oval. Where practise the points touch?
Move your peg (or slider) up, or down, a notch until the proportions line up. One narrow finish will measure out the reference caput and the other volition exist roughly the width/height of your oval. Voila
Now marking a spot somewhere in the center of your reference. This will be your measuring bespeak. Everything will exist measured out from this dot. You tin can measure the radials from this middle point.
The distances volition be authentic but if you're not confident you'll even so miscalculate some of the angles. Let'southward say you lot're drawing the optics. You may think they are on a horizontal line, in fact, the head might be slightly tilted and one educatee is lower than the other.
In that example, you lot will benefit from drawing one vertical and horizontal line centered on your spot. Now you lot tin measure from both the middle spot and the nearest line. Your true angles will be easier to see.
Good dividers are hard to discover for a reasonable price. I bought a cheap wooden pair (higher up) and they are not accurate enough for me. I ordered a pair of cheap plastic Prospek dividers which looked much better online, but they were flimsy besides.
Lastly, I ordered some brass dividers on Amazon (affiliate) and they are much better. Take a look yourself.
Fed upwardly with Amazon? Try Arteza (affiliate)
How to Scale Upwardly Your Drawing Using a Photocopy
What if you are in an insane hurry? You have a deadline to meet and demand to get the work done chop-chop, what then?
You lot tin always trace a photocopy. I saw portrait artists in Thailand depict this way.
Overstate a photocopy to the desired size and, using a soft form of pencil, shade the back of the paper with a layer of graphite.
Flip it over and tape the summit edge to your drawing paper using low-tack tape. Now, using a medium grade (HB), trace the cardinal lines without pressing too hard.
You can lift the paper at present and again to make sure the tracing is transferring properly and you lot take all the about important features marked out.
I discuss the correct and wrongs of tracing here: Tracing Fine art – Is It Good or Bad? When Is Tracing Cheating and Is It Ever OK?
Some graphite volition transfer with the weight of your manus pressing onto the copy and then you may accept to tidy the tracing with an eraser.
You now accept all the proportions you demand to crack on with the job.
Why not apply a lightbox?
A lightbox, if you don't already know, is an opaque screen backlit with a strong light. The creative person tapes a preliminary sketch or photocopy onto the screen and tapes the drawing paper over the elevation. The creative person and so traces the outline.
I fabricated own a lightbox many years agone, but it only worked well in a darkened room and was only good for tracing onto thin paper. Information technology was expedient for drawing commercial work, where time mattered.
Mod lightboxes are much better than they were. At that place are enough of lightboxes on Amazon (affiliate)
How to Scale Upwards Your Drawing Using a Projector
I also experimented with projectors many years ago. In those days there were three choices, slide, overhead, and opaque projectors. At present you lot have digital projectors that are far better.
I endemic an opaque projector back in the '80s and amazingly they are still manufactured and called Autographs.
They work by projecting a photo, printout, or sketch, onto a vertical surface. Yous place the photo nether the projector. A bright lightbulb shines the epitome onto a mirror, or prism, and bounces the light back through a lens, and projects it onto a wall or canvas.
There are major drawbacks.
- To become an image in proportion the projection must be at a fixed xc-degree angle or it will distort the image.
- The cheap models can become then hot the bulb can buckle paper or even melt a photo.
- They can only projection from small images.
- They need a darkened room.
- They are expensive for what you get.
I can't think of a proficient reason to utilize i. The same tin exist said for slide and overhead projectors. They are relics.
If yous wish to project an epitome, buy a cheap LED digital projector (affiliate). Yous tin can selection them up for $80-$100 hands plenty. They are small, don't overheat, and are portable.
The LED bulbs are super bright and fifty-fifty the cheaper models exceed 2000 lumens; that's blinding. They are and so brilliant yous can utilize them in daylight. No more darkened rooms. The more expensive models are perfect for muralists.
All you need is a digital file, a tripod, and a spirit level to align your image properly, and off you lot become. You can project the picture to your desired size and the tracing volition only take minutes.
How to Scale Up a Cartoon – Final Thoughts
Four piece of cake means to calibration up a cartoon. If you are cartoon solely for pleasure with no commercial pressure I would recommend you use the proportional dividers. They will teach your brain to encounter in the correct way. Eventually, yous will utilise them less and less and come across the proportions without a drawing aid.
If you lot are stuck for fourth dimension, tracing is the quickest mode to get something usable on newspaper.
If tracing is a step likewise far, apply a grid. It's laborious but you'll get results.
I depict my piece of work in public and use the grid method considering I fear going incorrect in forepart of an audience. It'south foolproof and perfect for photo-realism.
Happy Scaling.
If you lack confidence you should take a class and get into the habit of drawing. I institute this form on Skillshare (affiliate), 75436 students tin can't exist incorrect!
These are my drawing tools if y'all're curious: (Amazon affiliate links)
- Pentel Mechanical Pencils 0.3mm
- Derwent Graphic Drawing Pencils
- Daler-Rowney Heavyweight Cartridge Paper
- Jakar Battery Eraser
- Tombo Mono Eraser Pen
- Faber Castell Putty Eraser
- Blu Tack
- Contumely Dividers
You can calibration up your drawings just how do you sell them? If you wanna alive your dreams and make money with your fine art I tin can evidence yous how!

If You Want to Sell Your Art
Check this out!
Psst…it's only $12.99!
If you found this article useful, you volition like these related articles:
- Is Drawing From Photos Bad? Are You lot Cheating?
- How to Create Depth in Your Cartoon and See it Ameliorate
- Can Anyone Learn to Draw? 5 Keen Tips to Get You Started
- What'southward The Right Newspaper For Pencil Drawing? (How to Choose Wisely)
- How to Make Your Drawings Interesting: fourteen Hacks to Add together More than OOMPH
- Can You Copy Art and Sell a Painting of a Painting? I Found Out
Pin Information technology AND SAVE IT

Source: https://www.wildlifeartstore.com/scale-up-a-drawing/